Before day-old chicks arrive, buy or borrow the brooder, heat source, thermometer, chick starter feed, chick feeder, chick waterer, absorbent bedding, draft protection, pet protection, and backup supplies. Set the brooder up before the chicks are in your hands, then test it long enough to fix heat, drafts, and layout problems calmly.
Day-old chicks make people shop emotionally. They are small, noisy, fragile, and easy to underestimate. The useful buy list is not the cutest list. It is the list that keeps them warm, dry, fed, watered, contained, and easy to observe from the first hour.
The real decision before chicks arrive
The real decision is not which adorable accessory belongs in the cart. It is whether your brooder setup can handle the first week without panic. Newly hatched chicks need warmth, clean water, complete starter feed, dry footing, enough room to move toward and away from heat, and protection from drafts, pets, and curious hands.
University extension guides vary in exact wording, but the core beginner advice is consistent: chicks need supplemental heat early, brooder temperature should be monitored, and chick behavior is an important signal. If chicks pile tightly under heat, they may be cold. If they stay far away from heat and pant or spread out against the edges, they may be too warm. If they move, eat, drink, and rest comfortably, the setup is closer to right.
1. A brooder container that is boring and workable
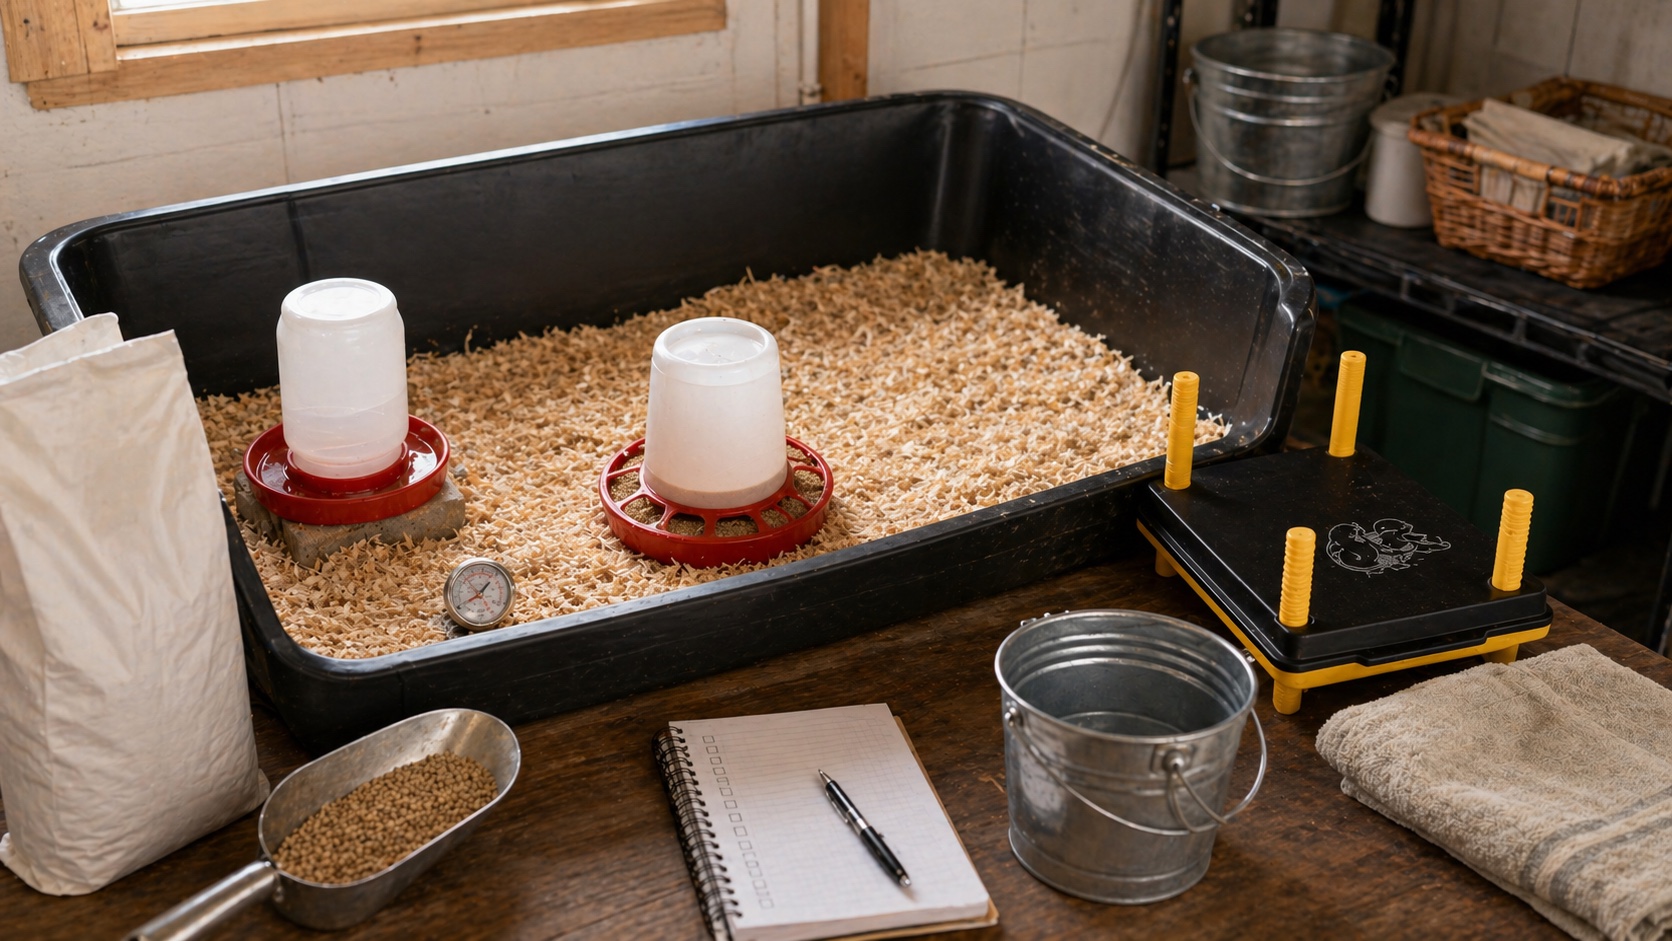
The brooder does not need to be beautiful. It needs to hold bedding, hold heat, block drafts, prevent escapes, and let you clean without making every chore a production. Large storage totes, stock tanks, brooder panels, kiddie pools with secure sides, or simple framed brooder areas can all work when they are set up safely.
Before choosing, ask where it will sit for several weeks. A brooder in a busy living space may be easy to observe but dusty and noisy. A brooder in a garage or shed may be convenient but more vulnerable to drafts, temperature swings, pets, and forgotten checks. The best location is the one your household can monitor reliably.
2. A heat source you can install safely
Chicks cannot be treated like miniature adult chickens. They need supplemental heat early in life, and that heat has to be reliable. Many extension resources describe starting brooder temperatures around the mid-90s Fahrenheit near chick level, then reducing warmth gradually as chicks feather out. Your specific setup still has to be checked against the instructions for your heat source and the behavior of the birds.
I would not improvise heat at the last minute. Whatever source you choose, set it up before arrival, read the instructions, check the warm and cool areas, and make sure chicks can move away from heat. A brooder with only one temperature zone gives chicks fewer ways to self-regulate.
3. A thermometer and a behavior check
A thermometer is cheap compared with guessing. Put it near chick height in the warm zone, then watch behavior after the chicks arrive. Numbers help you start; chick behavior tells you whether the setup is working in real life.
4. Starter feed and chick-safe water
Buy chick starter feed before pickup day. Do not assume adult feed, scratch grains, or treats are close enough. Young chicks need a complete starter ration designed for growth. If you are deciding between medicated and non-medicated starter, ask your hatchery, feed store, or local extension office how that choice fits your vaccination status and local disease risk.
The waterer should be chick-sized and shallow enough to reduce drowning risk. Many beginners place clean pebbles or marbles in the water tray for the first few days if the tray is too deep, but the larger point is simple: chicks need constant access to clean water they can reach without getting soaked.
5. Bedding that stays dry and gives traction
Bedding is not a decoration. It protects footing, absorbs moisture, and makes cleanup possible. Pine shavings are common. Slick newspaper is a poor first layer because it can make footing harder for young chicks. Whatever you use, keep it dry and replace wet patches quickly, especially around the waterer.
Moisture is the quiet problem in many brooders. Wet bedding chills chicks, smells bad, and makes the brooder harder to manage. Buy enough bedding to change the wet areas without feeling like every cleanup is a budget decision.
6. Containment, draft control, and pet protection
Chicks grow faster than the first brooder picture suggests. They jump, flutter, scratch, spill water, and test edges. A brooder that is fine on day one may need a cover or taller sides sooner than expected. If you have dogs, cats, young children, or a busy garage, plan the barrier before the chicks arrive.
Draft control matters too. A garage door, basement floor, open window, or poorly placed fan can change the brooder environment quickly. You want ventilation without drafts blowing across the chicks.
What can wait
A lot of chick purchases feel useful because they belong to the future flock, not because they help the first week. You do not need decorative coop signs, adult feeders, automatic doors, fancy treat dispensers, or every supplement on the shelf before day-old chicks arrive.
A realistic pre-arrival timeline
This order protects you from the worst beginner pattern: buying chicks first and building the system afterward. Living animals should not be the pressure that forces the plan to become real.
What I would not buy yet
I would not buy a cart full of adult-chicken gear before the brooder proves itself. Adult feeders, adult waterers, nesting box curtains, egg baskets, coop decor, treat mixes, and automatic doors can wait. Some of those may be useful later. None of them replace a safe first week.
I would also avoid buying random supplements to solve problems I have not observed. Good starter feed, clean water, warmth, dry bedding, and observation solve more first-week issues than a shelf full of extras.
The budget reality check
The chick purchase is usually the smallest part of getting started. The brooder, heat source, feed, bedding, coop, fencing, predator protection, and recurring monthly costs are the real budget. Before bringing chicks home, write the first-month cost and the coop-completion cost on paper.
The useful next step
Before you buy anything else, write the brooder plan in one paragraph: where it will sit, how it will be heated, how you will measure warmth, what feed and bedding you will use, how pets and drafts will be blocked, and what your backup heat plan is.
If that paragraph is clear, the shopping list becomes calmer. If it is fuzzy, do not fix the feeling by buying more gear. Fix the plan first. Day-old chicks do not need a perfect homestead. They need a keeper who has the first week ready before they arrive.
Best Next Step
Use the chicken checklist before you buy more flock gear.
The chicken setup basics help turn the buy list into a real first-week brooder plan and first-year flock rhythm.
Browse the chicken setup basicsRecommended next reads
Read the next guide that supports this decision
These guides help you connect chick setup to flock size, cost, and the kind of chickens you actually want to raise.
Chickens
The Real Cost of Getting Started With Backyard Chickens
Backyard chickens can be a strong first step into homesteading, but the startup costs and recurring work deserve an honest look.
Chickens
How Many Chickens Should a Beginner Start With?
A practical, beginner-first guide to choosing a first flock size without overcommitting on coop space, feed, chores, or your actual week.
Chickens
Broilers vs Layers for Beginners
Choosing broilers or layers depends less on trend and more on your goals, budget, space, and appetite for daily routine.
Frequently asked questions
What do I need before day-old chicks arrive?
Have the brooder, heat source, thermometer, chick starter feed, chick-sized feeder, chick waterer, absorbent bedding, draft protection, pet protection, and a backup plan ready before pickup or delivery.
Should I use a heat lamp or brooder plate?
Both can work when used correctly, but beginners should choose the option they can install safely, monitor consistently, and back up if it fails. Heat lamps require strict fire awareness and secure mounting. Brooder plates reduce some fire concern but still need correct height, space, and observation.
Do chicks need grit, treats, or supplements right away?
Most beginners should start with clean water and a complete chick starter feed. Treats, scratch, and extras can wait unless a vet or reliable poultry advisor gives a specific reason.
When should the brooder be ready?
Set it up and run the heat source at least the day before chicks arrive. That gives you time to check temperature, drafts, feeder placement, waterer height, and whether the setup is easy to clean.
Recommendations
Useful tools and resources for this decision
These are included only where they reduce repeated friction, clarify a next step, or help you avoid buying the wrong thing first.
Beginner-friendly
Harris Farms galvanized hanging poultry feeder, 30 lb
A straightforward metal feeder for a modest flock when you want capacity without a complicated mechanism.
Check current priceWorth the money
Farm Tuff top-fill poultry fountain, 5 gallon
A larger gravity-fed waterer for people who want fewer refills without adding an elaborate watering system.
Check current pricePortable fencing
Useful when you are still experimenting with layout, movement, and protection.
Worth waiting on until you know your actual pattern.
Check current priceRecommended next reads
Read next if it helps the decision
Move into the next guide only if it clarifies the next practical step.
Chickens
The Real Cost of Getting Started With Backyard Chickens
Backyard chickens can be a strong first step into homesteading, but the startup costs and recurring work deserve an honest look.
Chickens
How Many Chickens Should a Beginner Start With?
A practical, beginner-first guide to choosing a first flock size without overcommitting on coop space, feed, chores, or your actual week.
Chickens
Broilers vs Layers for Beginners
Choosing broilers or layers depends less on trend and more on your goals, budget, space, and appetite for daily routine.
Chicken setup support
Get the chicken setup checklist before you buy more flock gear.
Use the first-year checklist to price the flock honestly, cover the starter essentials, and delay the upgrades that can wait.
Best for: Readers trying to price a first flock honestly and avoid a scattered chicken setup.
- A pre-chick setup checklist
- A recurring-cost planning section
- A simple weekly flock-care rhythm
Chicken setup notes, beginner flock lessons, and the checklist first.
After signup, the download will unlock right here so you can save or print it.
About the author
William Mock
Founder, writer, and beginner homesteader
William writes from the beginner side of rebuilding after a layoff: homestead plans, family systems, budgets, tools, and the decisions that make a home feel less fragile.
Read why this site existsRelated Guides
Keep building context
Chickens
The Real Cost of Getting Started With Backyard Chickens
Backyard chickens can be a strong first step into homesteading, but the startup costs and recurring work deserve an honest look.
Chickens
How Many Chickens Should a Beginner Start With?
A practical, beginner-first guide to choosing a first flock size without overcommitting on coop space, feed, chores, or your actual week.
Chickens
Broilers vs Layers for Beginners
Choosing broilers or layers depends less on trend and more on your goals, budget, space, and appetite for daily routine.